Congrats to all the new photographers on completing your course. You'll no doubt have lots of things to practice so make sure you get out there and take some shots while it's still fresh in your mind.
When you come back and you're ready to put your pics up on your blog, take a moment to consider some simple photo editing to make those shots really stand out.
For many people "Photoshopping" is a bad word that involves making models skinnier and boobs bigger. But that's not what photo editing software was intended for. Just as a film photographer would spend some time in the dark room getting the right print, many consider photo editing as the "digital darkroom" where you can get the most out of your photos.
The other misconception is that it's really hard to learn, well that one is true ... Photoshop has a steep learning curve. That's why I recommend you use something simpler to get started.
Paint.NET is a great little
free photo editing program for windows that allows you to do the basic adjustments without needing a 1000-page manual.
Unfortunately, Paint.NET lacks a few basic plugins ... but that's OK, I wrote them just for you!
Got everything installed? Good ... let's start!
There are a a few things that often need adjusting, so it's good to learn how to spot them and then apply the right correction in software.
- Exposure - Maybe you didn't get your exposure settings just right, or maybe the scene tricked your camera into taking incorrect exposure. That's easy to fix. But spotting exposure errors is a little harder and takes some practice. I'll show you some examples of incorrect exposure.
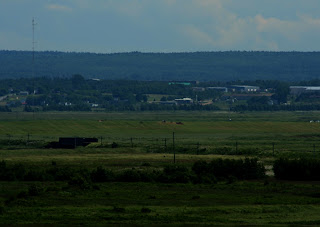
Overexposed (too light) Your camera took its exposure measurement on something dark in a bright scene.

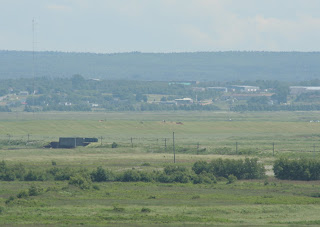
Underexposed (too dark) Your camera took its exposure measurement on something light in a dark scene
Washed out colors (happens sometimes when shooting towards the sun)
Fixing exposure is usually just a question of brightness/contrast. But the standard Brightness/Contrast that comes with photo editing software is useless to fix photos. It will brightnen your blacks and make white hightlights look grey. That's where you need Levels adjustments. It's a like the Tide(tm) of brightness/Contrast; it keeps your whites white and your darks dark. It can be found under the "Adjustments" menu at the top of Paint.NET and it's called "Simple Levels..."

The basic idea is you want to make the most of the color curve in the middle (called a histogram). Notice the three arrows under the curve (black, grey and white), these are your adjustments. For an average scene, you want to drag the black cursor towards the right until it points to the beginning of the curve. Same with the white cursor (but moved left), or you can hit the "Auto" button. Then using the middle (grey) cursor, adjust your contrast without changing what's black and what's white. Go ahead, try it on the images above see how Levels adjustments can save a bad photo! Play around with all three cursors to get a good feel of what they do. And use the
Preview tick box to get a quick before-after of your work.

Levels adjustments have saved this boring picture !
Sometimes an image will only have a gap on one side, not both, that's ok, you don't need to touch all three to fix an image, you don't even need to touch it all at if the exposure is correct. But get used to at least looking at the histogram when you're reviewing your pictures, you'll soon get an "eye" to spot which pictures actually need fixing.
2. White Balance - This one is easier to fix but harder to spot. When your camera takes a picture it tries to judge the color of the light. Light isn't always white, but our eye does a good job at adjusting to make it look white. Your camera tries to do this too, but doesn't always succeed. The color of the light also plays on how an image "feels" when you look at it. Skin tones look bad when the light is "cold" (blue tint) and make people look cold or sick. "Warm" (yellow) light on skin looks healthier and flattering. Using a flash often results in weird color tints as well. To correct these we go to the "Adjustments" menu again and select "Simple White Balance..."
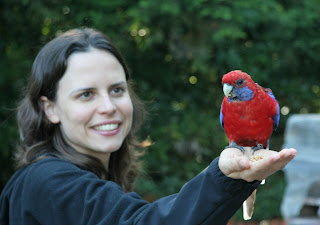
Correction is just a matter of moving the temperature slider to make the image warmer or colder. (Try +0.25 to +0.30 on the example image above, remember to use the Preview tick box to preview changes as these may be subtle)
3. Sharpening - All images can benefit from a little bit of sharpening. Pros sharpen ALL their pictures before publishing. It can really help your photos stand out. Just remember to sharpen as the last step (after resizing), right before saving your final photo for posting. To sharpen in Paint.NET goto the "Effects" menu and select "Photo ..." then "Sharpen". A small value (1 to 5) should be enough to sharpen your picture without looking fake, no Preview tick box though, I didn't write this one :-(
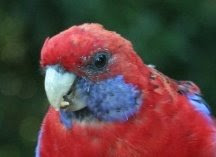
Subtle difference, but the sharpened one below shows more detail around the eye.

That's the three main things I recommend doing everytime you work on a picture. Levels, White Balance and Sharpening. Once you get used to spotting errors, you can breeze through a dozen pictures in 5 minutes.
So there, more new things to practice. Have fun ... and lets see those pics!


